

Azure offers a set of managed products called Azure SQL that takes the SQL Server capabilities into the cloud environment. In this article, we are going to discuss those and see how to create an SQL database in Azure. Then, we’ll see how we can configure the database for access from the development environment. After that, we’ll create an ASP.NET Core application that connects to this database. Finally, we’ll publish the application into Azure and verify that everything works well inside the cloud environment.
To read more about Azure, you can visit our Azure with ASP.NET Core page, where you can find all the articles from the series.
Let’s dive in.

Introduction to Azure SQL
The Azure SQL has three major components:
Azure SQL Database
This is a fully-managed relational database service in Azure. This is a Platform-as-a-Service (PaaS) offering of SQL database and is sometimes referred to as a Database-as-a-Service (DBaaS).
Azure SQL database is based on the latest stable Enterprise Edition of SQL Server without the hassle of installation, configuration, updates, etc. Being a PaaS service, we can scale up or scale out with a pay-as-you-go model. Additionally, it offers some additional capabilities that are not available in SQL Server, like built-in high availability, intelligence, and management.
Azure SQL Managed Instance
This is also a PaaS offering, but it offers 100% compatibility with the SQL Server database engine. This is primarily meant for migrating existing on-premises database servers to the cloud without any changes, which is often referred to as a Lift and Shift model. By migrating to Azure SQL Managed Instance, we get the latest stable SQL Server features and all of the PaaS benefits.
SQL Server on Azure VMs
This is an Infrastructure-as-a-Service (IaaS) offering that allows us to run SQL Server inside a fully managed virtual machine (VM) in Azure. This also provides the capability to lift-and-shift our SQL Server database with ease while maintaining 100% SQL Server compatibility and even operating system-level access. This is best suited for migrations where applications require full administrative control over the database instance and the underlying OS.
In the next section, we are going to learn how to create an Azure SQL database.
Creating an Azure SQL Database
Let’s learn how to create an Azure SQL database using the Azure Portal.
We can create a new database using the SQL Database option from Azure Marketplace:

Let’s create and configure a new database.
Configurations for New Database
In the Create SQL Database screen, we need to provide a few details about the new database:
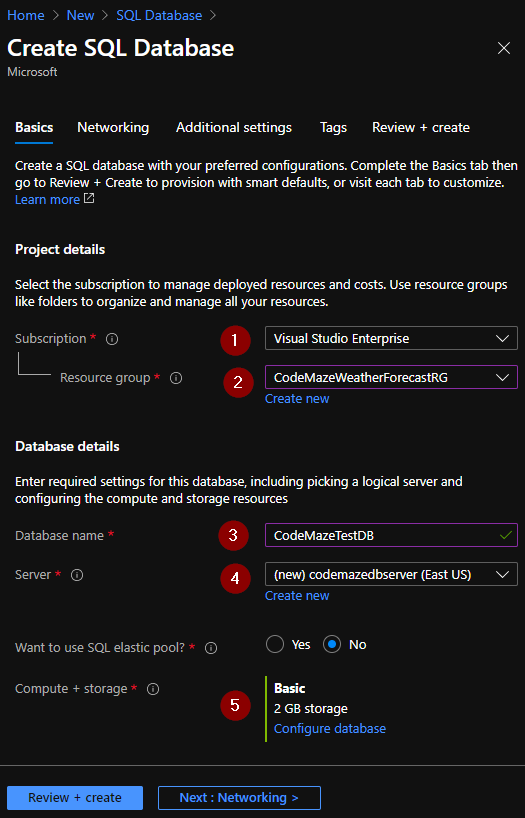
- First, we need to select a valid Subscription
- Then we need to either select an existing Resource Group or create a new one
- After that, we need to provide a Database name
- Then we need to select an existing Server or create a new one. If we choose to create a new server, we need to provide a few additional details related to the new database server:
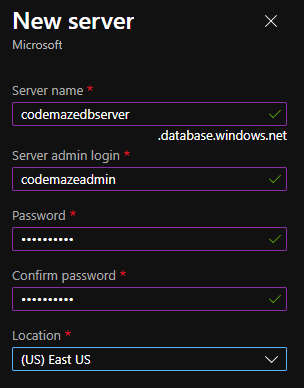
For creating a new server, we need to specify a Server name, Admin login, Password, and Location. Let’s note the login details as we’ll be using this to connect to our database later.
- Finally, we need to select a Compute + Storage option. This will determine how much CPU power, memory, storage, etc are dedicated to our database. We can explore various options by clicking on the configure database link and select the option that suits us the best. Remember that the selection that we make here will have a big impact on the monthly billing for our cloud database.
After proving these details, we can first click on the Review + Create button to review the details and then complete the process by clicking on the Create button.
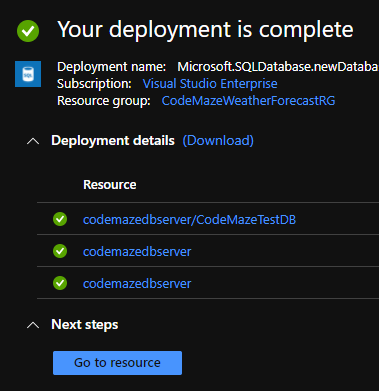
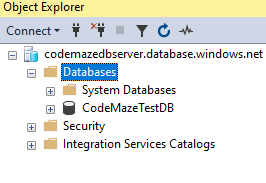
This will trigger the deployment process and we can see a notification once the resources are created. We can visit the database by clicking on the Go to resource button:
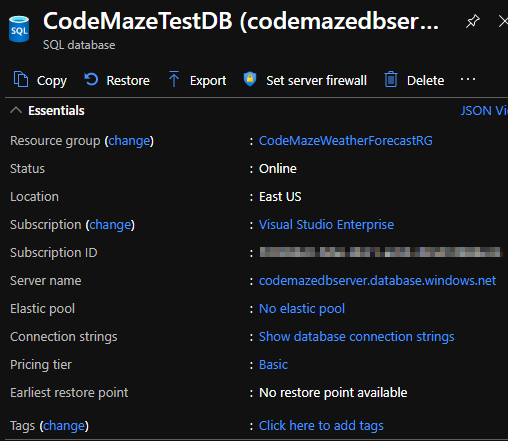
Congratulations! We have successfully created an Azure SQL database and can see the details once we navigate to it:
In the next section, we’ll see how we can connect to this database and work on it.
Connecting to an Azure SQL database
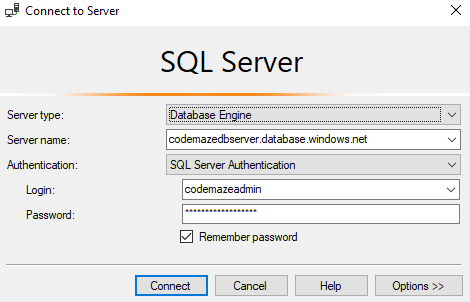
Now let’s see how we can connect to an Azure SQL database and work on it. For this, we can use various tools such as Azure Data Studio, SQL Server Management Studio (SSMS), Visual Studio, Visual Studio Code, etc. In this example, we’ll use SQL Server Management Studio.
For connecting to the Azure SQL database, we need to use the server name and login details that we specified while creating it:
Initially, while trying to connect to the database, we are likely to get a connection error:
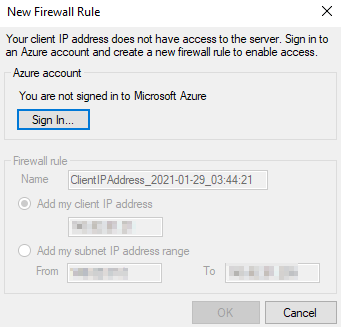
This is because by default Azure SQL Server does not accept any inbound connections. Let’s see how we can fix this.
Configuring the Azure SQL Database Firewall
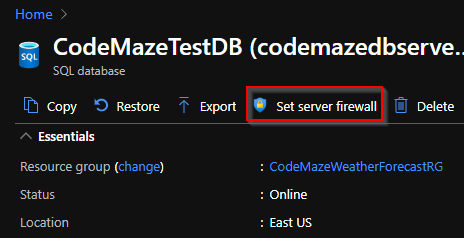
For connecting to an Azure SQL database, we need to configure firewall rules to allow connections from our IP addresses. We can do that using the Set Server Firewall option of the database:
In the Firewall settings screen, we need to create a new firewall rule by specifying the start and end IP address:
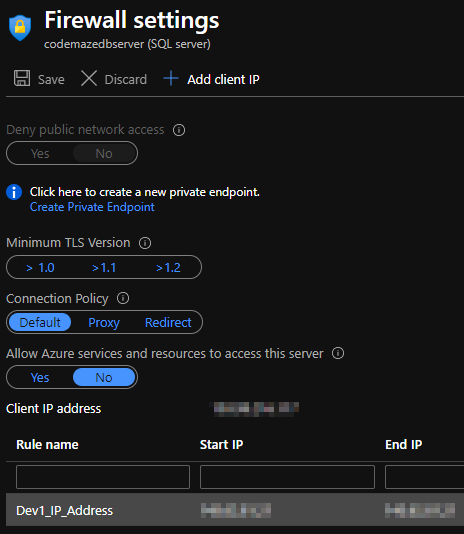
This will explicitly allow connections coming from that IP address range. After adding the rule, let’s try accessing the database once again:
This time we can see that the connection is successful and it will list the database that we created. Cool!
Our database doesn’t have any data yet, but we are going to set it up soon in the next section.
Populating Data in Azure SQL database
Now, let’s create a table named Employee and populate it with some data. We can use an SQL script to perform this:
CREATE TABLE employee
  (
     id          BIGINT IDENTITY(1, 1) PRIMARY KEY,
     firstname   VARCHAR (20) DEFAULT NULL,
     lastname    VARCHAR (25) NOT NULL,
     email       VARCHAR (100) NOT NULL,
     phonenumber VARCHAR (20) DEFAULT NULL
  );

INSERT INTO employee
VALUES      ('John',
             'Doe',
             '[email protected]',
             '555-666-7777'),
            ( 'Jake',
              'Smith',
              '[email protected]',
              '222-666-7777'),
            ('Jane',
             'Cook',
             '[email protected]',
             '333-555-7777')

SELECT *
FROM   employee
This will create a table with our data:
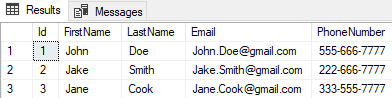
Perfect!
In the next section, we are going to see how to create an ASP.NET Core application that fetches data from this database.
Creating an application that connects to Azure SQL
In this section, we are going to create an ASP.NET Core Web API project that connects to the Azure SQL database and fetches data from it. We have explained ASP.NET Core Web API in detail in our .NET Core Tutorial – Creating the restful Web API series. Following through the series, let’s create an ASP.NET Core Web API project. In this example, we are using ASP.NET Core 5, which is the latest version of ASP.NET at the time of writing this article, but the code should work pretty well with previous versions as well.
Configurations
Once the Web API project is ready, we are going to add an EmployeeController class to fetch data from the database.
Before that, we need to add the System.Data.SqlClient NuGet package:
Install-Package System.Data.SqlClient
This package provides the capabilities to connect to and work with SQL Server. Once the package is installed, the next step is to configure the connection string in the appsettings.json file:
  "ConnectionStrings": {

    "EmployeeDatabase": "Server=tcp:codemazedbserver.database.windows.net,1433;Initial Catalog=CodeMazeTestDB;Persist Security Info=False;User ID={our_userID};Password={our_password};MultipleActiveResultSets=False;Encrypt=True;TrustServerCertificate=False;Connection Timeout=30;"

  },
Coding
Now, let’s add the EmployeeController class:
[Route("api/[controller]")]
[ApiController]
public class EmployeeController : ControllerBase
{
    private readonly IConfiguration _configuration;

    public EmployeeController(IConfiguration configuration)
    {
        _configuration = configuration;
    }


    [HttpGet]
    public IEnumerable<Employee> Get()
    {
        var employees = GetEmployees();
        return employees;
    }

    private IEnumerable<Employee> GetEmployees()
    {
        var employees = new List<Employee>();

        using (var connection = new SqlConnection(_configuration.GetConnectionString("EmployeeDatabase")))
        {
            var sql = "SELECT Id, FirstName, LastName, Email, PhoneNumber FROM Employee";

            connection.Open();
            using SqlCommand command = new SqlCommand(sql, connection);
            using SqlDataReader reader = command.ExecuteReader();

            while (reader.Read())
            {
                var employee = new Employee()
                {
                    Id = (long)reader["Id"],
                    FirstName = reader["FirstName"].ToString(),
                    LastName = reader["LastName"].ToString(),
                    Email = reader["Email"].ToString(),
                    PhoneNumber = reader["PhoneNumber"].ToString(),
                };

                employees.Add(employee);
            }
        }

        return employees;
    }
}
Here, first, we inject the IConfiguration into the EmployeeController class. This will help us to access the configuration values from the controller. Then we read the connection string and use that to establish the connection to the database. After that, we define the SQL query and execute it against the Azure SQL database. Finally, we retrieve the data and map it into a collection of Employee models.
In this example, to keep things simple and focused on the topic, we have implemented the data access logic in the controller class itself. But in the real world, we should try to separate our data access logic into a separate Data Access Layer or use the repository pattern. Similarly, we have used ADO.NET for data access, but we could use EF Core instead if we prefer working with models using an ORM tool. We have explained how to implement a repository pattern with EF Core using ASP.NET Web API in our ASP.NET Core Web API – Repository Pattern article which should be a good reference.
Running the Application Locally
Now let’s run the application locally. With ASP.NET Core 5.0, the Web API templates have the OpenAPI support by default and we can browse the API endpoints using the Swagger UI:
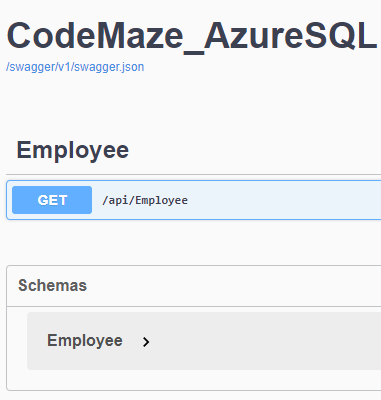
Let’s execute the Get endpoint and see the results:
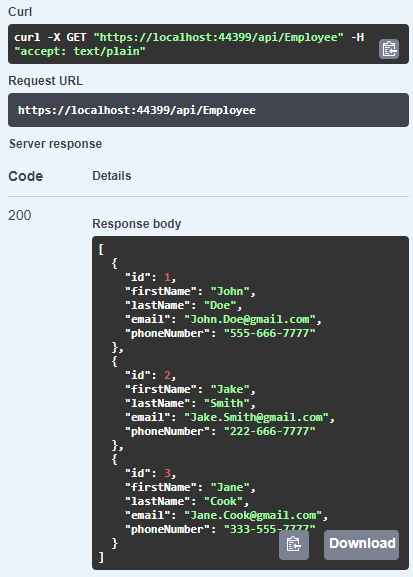
We can see the employees listed in the swagger response.
Cool!
Now let’s go ahead and deploy our application into Azure.
Deploying the application
We have explained the process of deploying an ASP.NET Core Web API project into Azure API App Service in detail in our Deploying ASP.NET Core Web API to Azure API Apps article. Let’s follow the same process here as well.
By default, swagger is enabled only in the development environment. But we can explore the APIs using swagger after deploying into Azure by modifying the Configure() method of the Startup class:
public void Configure(IApplicationBuilder app, IWebHostEnvironment env)
{
    if (env.IsDevelopment())
    {
        app.UseDeveloperExceptionPage();
    }

    app.UseSwagger();
    app.UseSwaggerUI(c => c.SwaggerEndpoint("/swagger/v1/swagger.json", "CodeMaze_AzureSQL v1"));

...
}
Now let’s proceed to test the application.
Testing the application
Once we deploy the application, we can access the API by navigating to its URL:
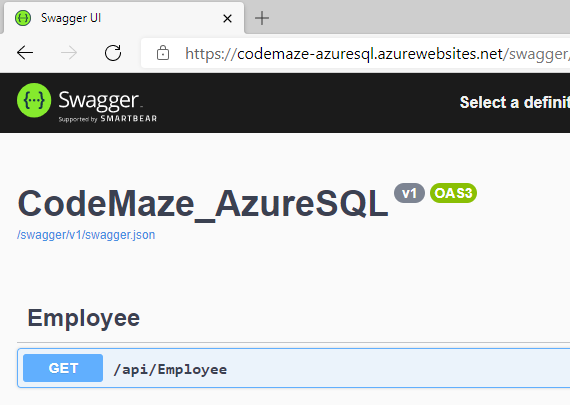
We can see the API endpoint listed.
Great!
Now let’s try to execute the Employee/Get endpoint:
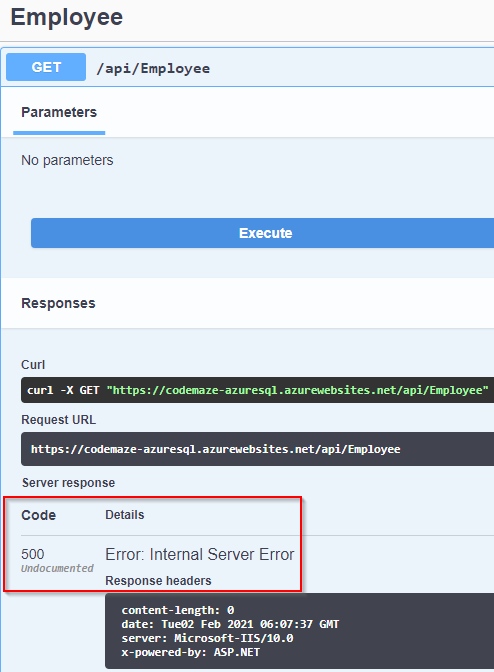
This time we can see that the request fails with an internal server error. Let’s investigate the error details.
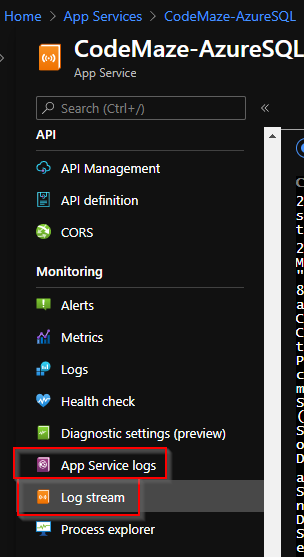
We can investigate the App Service logs in the Log Stream section inside the Monitoring. Before that, we may have to enable Application Logging in the App Service Logs blade, if it is not already enabled:
Once it is enabled, we can see the exception details in the Log Stream:
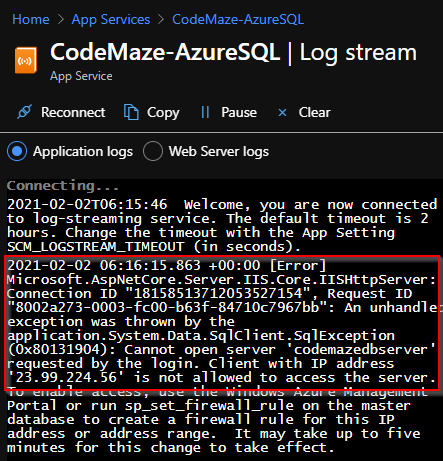
As we can see in the logs the issue is that our API app doesn’t have access to the Azure SQL database. So let’s go ahead and add it.
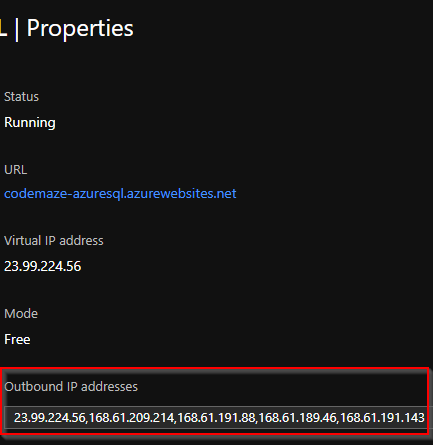
Configuring Outbound IP addresses
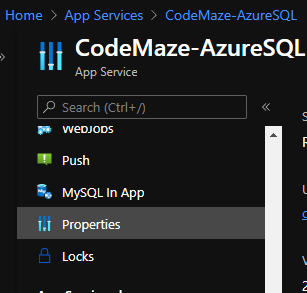
Azure App Service will have a set of outbound IP addresses that it uses to call external services. We can see that by navigating to the Properties section:
From the Properties section, let’s copy the list of outbound IP addresses:
Then we need to configure each of these IP addresses as separate rules in the Firewall settings of the database just like how we added the local system IP address in the earlier section:
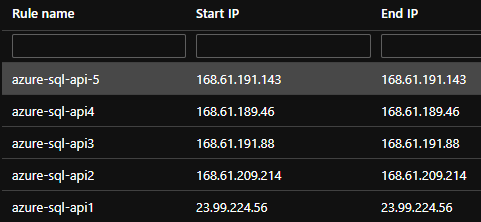
Once we save the changes to database Firewall Settings, let’s try to execute the API endpoint once again:
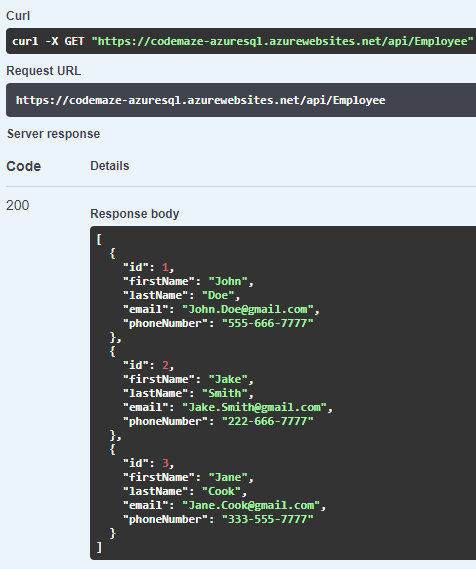
This time it works and returns the list of employees from the database.
Excellent!
Now let’s take a look at the deployment architecture that we implemented in this example:
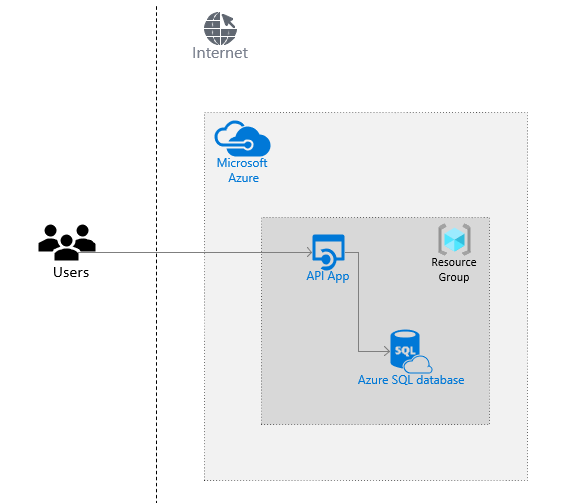
We have created and deployed an ASP.NET Core Web API application into an Azure API app. The API app communicates with an Azure SQL database that resides in the same resource group.
Conclusion
So, that’s it for this article.
To sum up, we have learned about:
- Introduction to Azure SQL
- Creating an Azure SQL database from the portal
- Configuring firewall rules to allow access to Azure SQL database
- Creating an ASP.NET Core Web API app that connects to an Azure SQL database
- How to allow an Azure App Service access to an Azure SQL database by configuring outbound IP addresses
Until the next one,
All the best.
This is a great blog. I learned a lot .