

In this article, we are going to learn Azure Cosmos DB in detail.
We’ll start by learning what an Azure Cosmos DB is and the various APIs that it supports. Then we’ll create a Cosmos DB from the portal. After that, we’ll learn how to create an ASP.NET Core application that connects with the Cosmos DB using the Core (SQL) API. First, we’ll test it locally and then deploy it to Azure. Finally, we’ll verify that everything works well together in the cloud environment.
To read more about Azure, you can visit our Azure with ASP.NET Core page, where you can find all the articles from the series.

Let’s start
Azure Cosmos DB – Introduction & Various APIs
Modern applications need to store huge volumes of data and make this available to users very quickly. Users expect the apps to be highly responsive and always online. To achieve these, we usually deploy multiple instances of these applications in data centers that are close to the users.
Azure Cosmos DB is a fully managed NoSQL database in the cloud for modern app development. It supports many open source APIs and SDKs for popular languages. Being a PaaS service, we don’t have to worry about database administration, management, updates, and patching. It can also handle automatic scaling by responding to real-time usage.
Cosmos DB is a great choice for Web, Mobile, Gaming, and IoT applications that needs to handle massive amounts of data. It provides real-time access with fast read and writes latencies globally, high throughput, and configurable consistency. Cosmos DB gives us simplified application development with fast and open-source APIs and multiple SDKs. It supports various database APIs including the native Core (SQL) API, API for MongoDB, Cassandra API, Gremlin API, and Table API. In this article, we are going to explore the Core (SQL) API with an ASP.NET Core WEB API application.
Creating an Azure Cosmos DB
For creating a Cosmos DB, we can use the Azure Cosmos DB template from the Azure Marketplace:
In the Create Azure Cosmos DB Account screen, we need to provide a few details for the account:
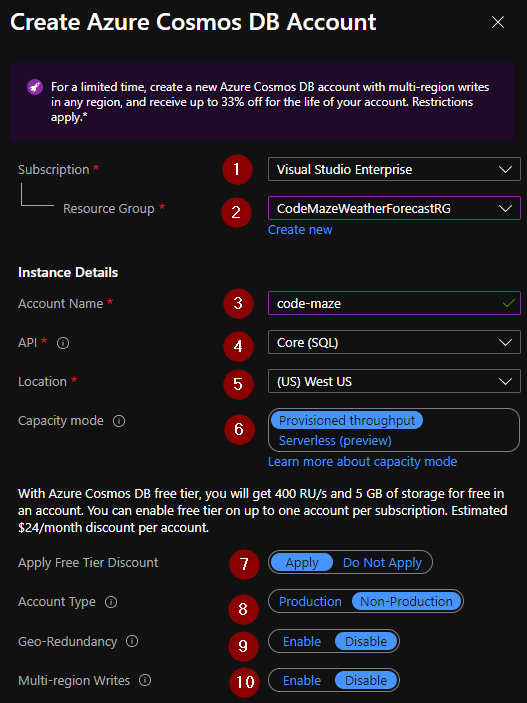
- First, we need to select an existing <>Subscription.
- Then we need to either select an existing Resource Group or create a new one.
- After that, we need to choose an Account Name.
- As we discussed in the previous section, Azure Cosmos DB provides various APIs and we need to choose one. In this example, we are going to use Core (SQL)
- Then we need to choose a Location.
- Azure Cosmos DB provides two capacity modes. For working with traffic requiring predictable performance, we can choose Provisioned Throughput. Serverless is a good choice while working with unpredictable traffic.
- While creating a Cosmos DB, we have an option to apply Free Tier Discount. Choosing this option will give us 400 Request Units per second and 5 GB of storage in one account for free.
- There is an option to choose Production or Non-Production Account Type. This will just change the UI experience offered in the portal and Cosmos Explorer and will not impact the service behavior.
- Choosing Geo-Redundancy will enable global distribution of databases by pairing certain Regions together. Let’s disable it in this example.
- Finally, the Multi-region Writes option improves the throughput of our databases and containers. We can disable this option for now.
After providing these options, we can Review and Create the database by first clicking on the Review + Create button and then Create button. We can see the step by step progress of deployment till it is completed:
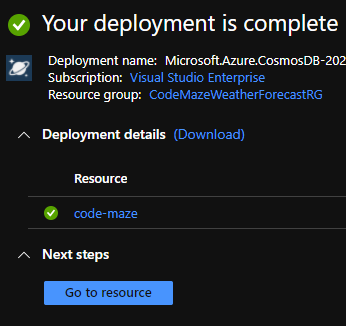
Once the database is created, we can navigate to it by clicking on the Go to resource link.
Exploring the Azure Cosmos DB
The Azure Cosmos DB organizes data in a hierarchical structure of Databases, Containers, and Items. We can add Database, Containers, and Items from the Data Explorer blade of the Cosmos DB.
On navigating to the Quickstart blade, there is an option to quickly create an Items container:
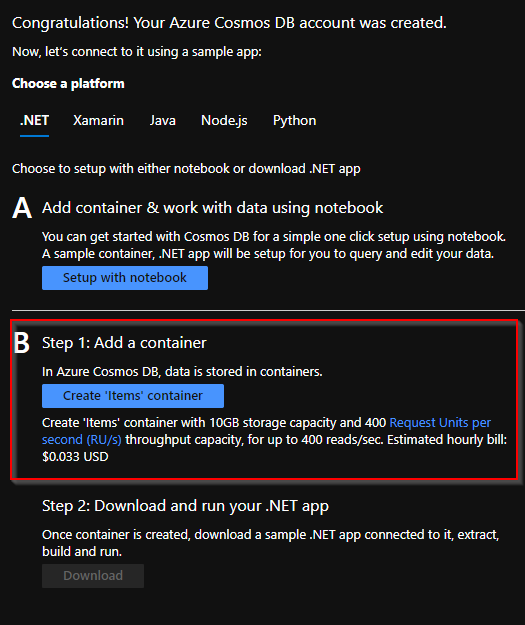
Using this option will create a database named ToDoList and a container named Items. We can use the Data Explorer blade to explore data inside the Cosmos DB:
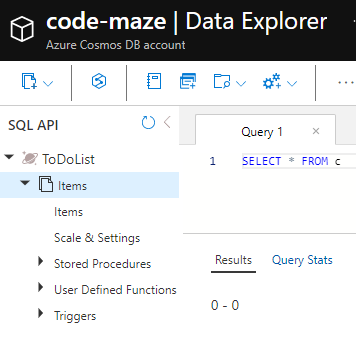
As we can see, It will not have any data initially, but don’t worry we are going to learn how to add and modify data using code later. But before that, let’s copy the URL and keys required to connect with the Cosmos DB account:
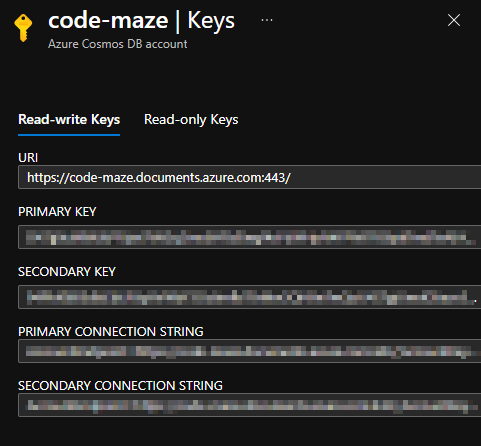
Azure Cosmos DB has 2 types of keys – Read-write and Read-only keys. We are going to use Read-write keys as we want to perform both read and write operations.
Building APIs that Talks with Azure Cosmos DB
The next step is building an ASP.NET Core Web API project that connects to the Azure Cosmos DB and works on it. We have explained ASP.NET Core Web API in detail in our .NET Core Tutorial – Creating the restful Web API series. Following through the series, let’s create an ASP.NET Core Web API project. In this example, we are using ASP.NET Core 5, which is the latest version of ASP.NET at the time of writing this article, but the code should work pretty well with previous versions as well.
Configuring the App
First, we need to add the NuGet packages required to connect to Azure Cosmos DB. We can do that by running the below commands in the NuGet package manager console:
Install-Package Microsoft.Azure.Cosmos
This will download and install the Azure Cosmos DB package and its dependencies.
Then, we need to add the configuration values that we copied earlier to the appsettings file:
{
  "Logging": {
    "LogLevel": {
      "Default": "Information",
      "Microsoft": "Warning",
      "Microsoft.Hosting.Lifetime": "Information"
    }
  },
  "AllowedHosts": "*",
  "CosmosDb": {
    "Account": "https://code-maze.documents.azure.com:443/",
    "Key": "<PRIMARY KEY of Azure Cosmos account>",
    "DatabaseName": "ToDoList",
    "ContainerName": "Items"
  }
}
Creating the Service
The next step is creating a service class to work with Cosmos DB. But before that, we need to create a model for representing a ToDo Item:
public class Item
{
    [JsonProperty(PropertyName = "id")]
    public string Id { get; set; }

    [JsonProperty(PropertyName = "name")]
    public string Name { get; set; }

    [JsonProperty(PropertyName = "description")]
    public string Description { get; set; }

    [JsonProperty(PropertyName = "isComplete")]
    public bool Completed { get; set; }
}
Azure Cosmos DB uses JSON to store data. We can use the JsonProperty attribute to control how JSON serializes and deserializes objects. For the Item class, the JsonProperty attribute controls the format of the property name that goes into JSON. Also, note that we rename the Completed property to isComplete.
Great!
Now let’s create the ICosmosDbService interface:
public interface ICosmosDbService
{
    Task<IEnumerable<Item>> GetMultipleAsync(string query);
    Task<Item> GetAsync(string id);
    Task AddAsync(Item item);
    Task UpdateAsync(string id, Item item);
    Task DeleteAsync(string id);
}
After that, let’s create the CosmosDbService class implementing the ICosmosDbService interface:
public class CosmosDbService : ICosmosDbService
{
    private Container _container;

    public CosmosDbService(
        CosmosClient cosmosDbClient,
        string databaseName,
        string containerName)
    {
        _container = cosmosDbClient.GetContainer(databaseName, containerName);
    }

    public async Task AddAsync(Item item)
    {
        await _container.CreateItemAsync(item, new PartitionKey(item.Id));
    }

    public async Task DeleteAsync(string id)
    {
        await _container.DeleteItemAsync<Item>(id, new PartitionKey(id));
    }

    public async Task<Item> GetAsync(string id)
    {
        try
        {
            var response = await _container.ReadItemAsync<Item>(id, new PartitionKey(id));
            return response.Resource;
        }
        catch (CosmosException) //For handling item not found and other exceptions
        {
            return null;
        }
    }

    public async Task<IEnumerable<Item>> GetMultipleAsync(string queryString)
    {
        var query = _container.GetItemQueryIterator<Item>(new QueryDefinition(queryString));

        var results = new List<Item>();
        while (query.HasMoreResults)
        {
            var response = await query.ReadNextAsync();
            results.AddRange(response.ToList());
        }

        return results;
    }

    public async Task UpdateAsync(string id, Item item)
    {
        await _container.UpsertItemAsync(item, new PartitionKey(id));
    }
}
In the service class, we have implemented methods to perform Add, Delete, Get, List, and Update operations using Microsoft.Azure.Cosmos package.
Initializing the Cosmos DB Client
The next step is to modify the Startup class to read configuration values and initialize the Cosmos DB client. For that, first, let’s add a new method to the Startup class:
private static async Task<CosmosDbService> InitializeCosmosClientInstanceAsync(IConfigurationSection configurationSection)
{
    var databaseName = configurationSection["DatabaseName"];
    var containerName = configurationSection["ContainerName"];
    var account = configurationSection["Account"];
    var key = configurationSection["Key"];

    var client = new Microsoft.Azure.Cosmos.CosmosClient(account, key);
    var database = await client.CreateDatabaseIfNotExistsAsync(databaseName);
    await database.Database.CreateContainerIfNotExistsAsync(containerName, "/id");

    var cosmosDbService = new CosmosDbService(client, databaseName, containerName);
    return cosmosDbService;
}
We need to call the new method from the ConfigureServices method in the same class:
public void ConfigureServices(IServiceCollection services)
{
    ...
    services.AddSingleton<ICosmosDbService>(InitializeCosmosClientInstanceAsync(Configuration.GetSection("CosmosDb")).GetAwaiter().GetResult());
}
Note that this code will create the specified database and container if it does not exist in the Azure Cosmos DB account. We can delete the database and container that we created earlier in our Cosmos DB account and verify that the application will recreate those when it starts.
That’s it. We have successfully configured and initialized the service. Now let’s proceed to create the API controller.
Creating the Controller
Let’s create an ItemsController class for implementing the endpoints:
[Route("api/[controller]")]
[ApiController]
public class ItemsController : ControllerBase
{
    private readonly ICosmosDbService _cosmosDbService;

    public ItemsController(ICosmosDbService cosmosDbService)
    {
        _cosmosDbService = cosmosDbService ?? throw new ArgumentNullException(nameof(cosmosDbService));
    }

    // GET api/items
    [HttpGet]
    public async Task<IActionResult> List()
    {
        return Ok(await _cosmosDbService.GetMultipleAsync("SELECT * FROM c"));
    }

    // GET api/items/5
    [HttpGet("{id}")]
    public async Task<IActionResult> Get(string id)
    {
        return Ok(await _cosmosDbService.GetAsync(id));
    }

    // POST api/items
    [HttpPost]
    public async Task<IActionResult> Create([FromBody] Item item)
    {
        item.Id = Guid.NewGuid().ToString();
        await _cosmosDbService.AddAsync(item);
        return CreatedAtAction(nameof(Get), new { id = item.Id }, item);
    }

    // PUT api/items/5
    [HttpPut("{id}")]
    public async Task<IActionResult> Edit([FromBody] Item item)
    {
        await _cosmosDbService.UpdateAsync(item.Id, item);
        return NoContent();
    }

    // DELETE api/items/5
    [HttpDelete("{id}")]
    public async Task<IActionResult> Delete(string id)
    {
        await _cosmosDbService.DeleteAsync(id);
        return NoContent();
    }
}
We have created an API controller with List, Get, Add, Edit, and Delete endpoints. Note that by injecting the service into the controller, we are invoking service methods corresponding to each action.
Cool! Now let’s proceed to test the application.
Testing the APIs Locally
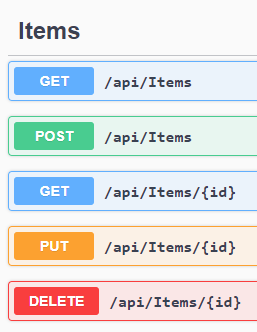
Once we run the application locally, we can see that the Swagger UI lists all the endpoints:
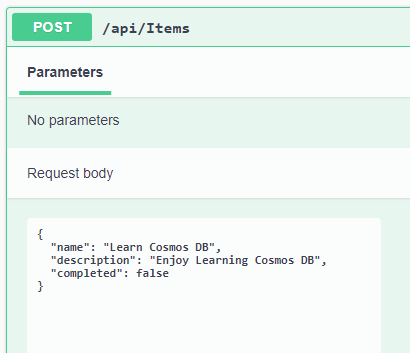
Since our database doesn’t have any data yet, let’s go ahead and create one record using the Create endpoint:
After that, let’s execute the endpoint to list all the records:
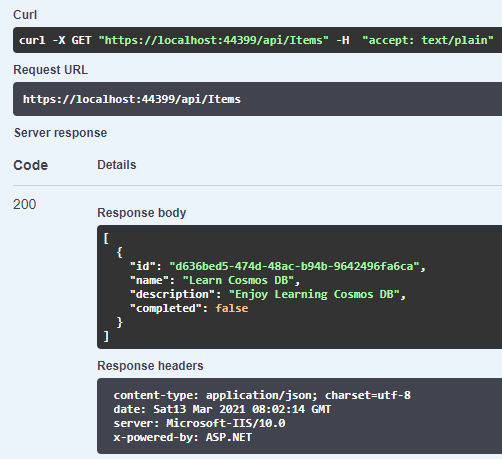
This will list the record that we just created.
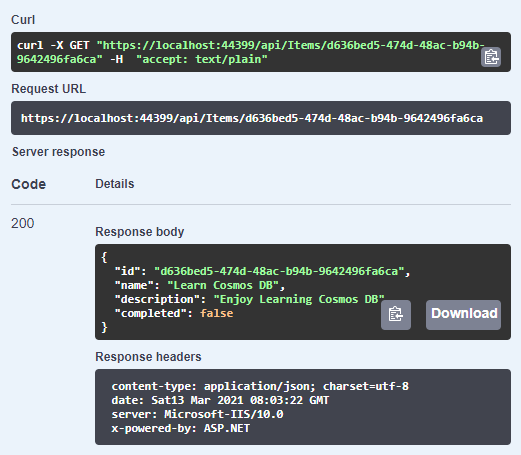
It is possible to fetch the record using the Get endpoint as well:
Now let’s try modifying the record using the Edit endpoint:

We can verify that the record is updated by invoking the Get endpoint once again:

Perfect!
Now let’s take a look at how the record is organized in the Cosmos DB by using Data Explorer:

We can see that Azure Cosmos DB stores data as JSON document structure. Note that there are a few additional fields as well for tracking the records internally.
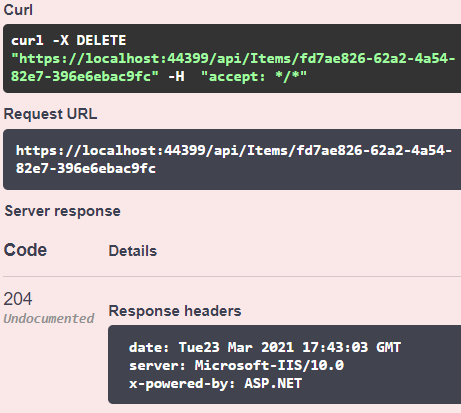
Finally, let’s try deleting the record by invoking the Delete endpoint:
We can verify that the Delete operation was successful by invoking the endpoint to list all records once again:
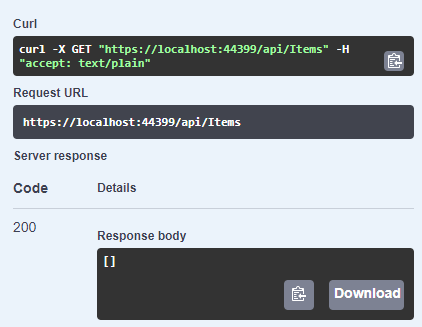
This time it returns an empty list.
Great!
We have confirmed that all endpoints work as expected locally. Now let’s proceed to deploy the application to Azure.
Deploying the APIs to Azure
Let’s go ahead and deploy our application into Azure. We have explained the process of deploying an ASP.NET Core Web API project into Azure API App Service in detail in our Deploying ASP.NET Core Web API to Azure API Apps article. We can follow the same process here as well. Additionally, we can enable Swagger in the deployed version as we have explained in the Deploying the application section of Azure SQL article. This will make it easier to test the hosted application.
Testing the APIs in Azure
Once the application is deployed to Azure, let’s test it by navigating to its URL. First, let’s try adding a new record:
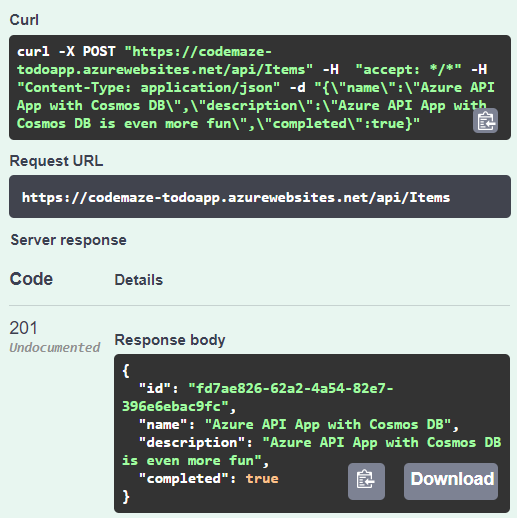
Once the record is added, let’s test the List endpoint:
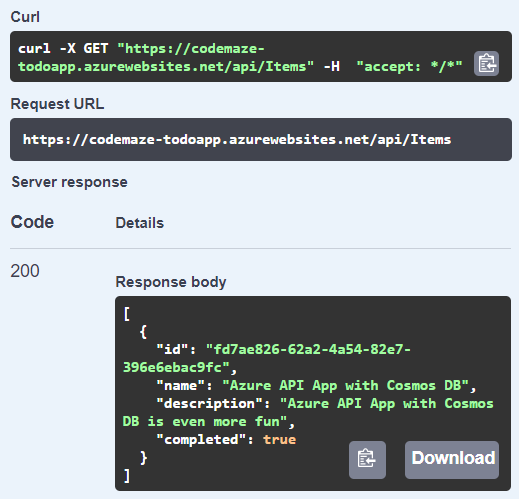
Cool!
We have verified that everything works as expected in the Azure environment as well.
We can summarize the deployment architecture that we use in this article with a simple diagram:
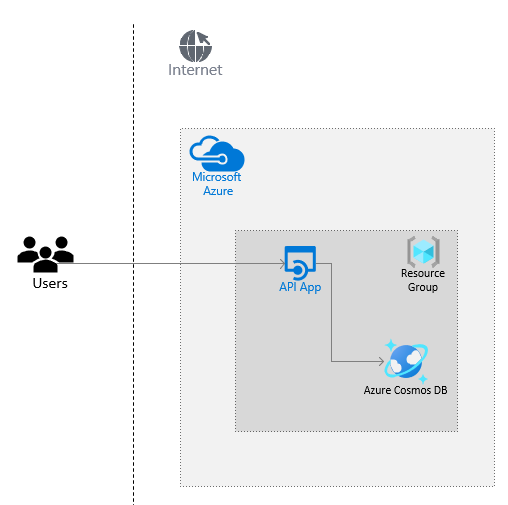
After building an ASP.NET Core Web API application, we have deployed it into an Azure API app. The API app communicates with an Azure Cosmos DB that resides in the same resource group. Users can access the APIs over the internet using the URL.
Conclusion
We have learned the following topics in this article:
- An introduction to Azure Cosmos DB and the various APIs it supports.
- Creating and exploring an Azure Cosmos DB from the portal.
- Building and deploying an ASP.NET Core Web API that talks with Azure Cosmos DB using the Core (SQL) API.
- Testing the API endpoints that connect with Azure Cosmos DB locally and in Azure.

It is very interesting topic you have designed this topic in such a way that everyone can understand it.
While Posting a new Item you might get an error like “Id is mandatory.”, even when a unique guid is generated for addition of doc.
Replace:
[JsonProperty(PropertyName = "id")] public string Id { get; set; }with
[JsonProperty(PropertyName = "id")] public string? Id { get; set; }Thanks for the tip!
We didn’t encounter this error while creating the code for this article, so not sure in which case this happens.
Same error I’m using .net 7 and Newton soft json
As @jay says, we need to make Id nullable in our C# Model
Hi, it is a nice read but the microsoft documentation says to use only one instance of CosmosClient per application. With this patter we will be creating multiple of them.
Since we are injecting the CosmosClient with singleton lifetime, I believe the application will be using a single instance. The same approach is mentioned in MSDN Docs for web app using .NET SDK:Tutorial: Develop an ASP.NET Core MVC web application with Azure Cosmos DB by using .NET SDK
Let me know if I missed something here.
An error occurred while starting the application.FormatException: The input is not a valid Base-64 string as it contains a non-base 64 character, more than two padding characters, or an illegal character among the padding characters.
System.Convert.FromBase64CharPtr(Char* inputPtr, int inputLength)
FormatException: The input is not a valid Base-64 string as it contains a non-base 64 character, more than two padding characters, or an illegal character among the padding characters.
services.AddSingleton<ICosmosDbService>(InitializeCosmosClientInstanceAsync(Configuration.GetSection("CosmosDb")).GetAwaiter().GetResult());Sorry, I missed this comment and couldn’t reply on time.
This looks like an issue with the configuration values. Hope you were able to fix this.
Hope to see more on Cosmos DB, like pagination, performance tuning/testing.
Sure Pawel. Will try to make some articles on those topics in future.
Hi,
Any tips how to improve
to allow stream ore than 100k items without failing? AsyncStreams? Custom enumerator?
Best regards.
Hi Pawel,
Yes- I think async streams (IAsyncEnumerable) would be a good choice for this scenario as Cosmos DB natively supports streaming behaviour. Here is an example
thanks for the article.. how .net core manages multiple container?
If you’re referring to a scenario where you have your data spread across multiple containers and you want to fetch them together, then I think that approach is not supported in Cosmos DB.
Generally speaking, Cosmos DB being a non-relational database, We do not store different entities in different containers if they need to be queried together. We’ll have to model our data in such a way to avoid that.
That said, it should be possible to keep different container names in our application configuration or settings and switch between them if we need to access data from different containers in different part of the application.
I have got to the bottom of the issue; it was my mistake.
In the ‘item.cs’ file, I was using System.Json rather than NewonSoft.JSON.
I working perfectly.
Thank you for providing such an extensive and interesting article.
Hi Michael,
Glad to hear that.
This example uses the inbuilt JSON capabilities provided by .NET 5 using System.Text.Json.Serialization namespace. Probably you added the additional NewtonSoft.JSON package which is not really required as these functionalities are available out of the box form .NET Core 3.1 onwards.
Anyway glad that you got it working fine.
You misunderstood him. The example does not work without making the change to Newtonsoft.Json. You also have to change the Attributes to ‘[JsonProperty(PropertyName = “id”)]’ which are different to System.Text when you change back to NewtonSoft. Try your code…
Thanks for bringing this to our notice, We’ll fix that asap.
We have fixed this and updated the code.
I have downloaded your code from Git and compiled the program.
Unfortunately, I have an error when using the PUT API:
DocDBTrace Error: 0 : DocumentClientException with status code BadRequest, message: Message: {“Errors”:[“The input content is invalid because the required properties – ‘id; ‘ – are missing. Learn more: https://aka.ms/CosmosDB/sql/errors/missing-id“]}, inner exception: null, and response headers: {
I have added links to documents with more details of the error.
I am struggling to identify the problem.
Any help would be appreciated.
Regards,
Michael
.Net Output
Swagger output
We need to make Id nullable in our C# Model